DNS server not responding to Windows 10
29 posts
• Page 1 of 3 • 1, 2, 3
DNS server not responding to Windows 10
Hi Guys - my laptop suddenly wont connect to the internet. I have logged off and restarted the laptop and disconnected the router and started it again but still have the problem. I have tried googling how to fix DNS server not responding but I am, as usual, totally baffled. Can anyone help by showing me the simple steps to regain my connection with the internet. I am lost without my laptop.
-

medsec222 - Posts: 1041
- Joined: 05 Feb 2013, 19:14
Re: DNS server not responding to Windows 10
The DNS server supplied by you ISP might have gone wobbly, but no problem.
Let's try a quick fix. Go here and download the benchmark app.
https://www.grc.com/dns/benchmark.htm
Open it an click on the Nameservers tab and the click Run Benchmark and leave it.
In the laptop you now right click on the W10 start button and from the menu click on Network Connections. In the search box type in Control Panel and select it from the results. Click Network and Sharing Centre. In the new windows click Change adaptor settings. Almost there.
The new window tells you which adaptor is in use - Ethernet or WiFi - click on the active one. You will now go to the Windows of old. Click on the Properties button at the bottom.
Look for Internet Protocol Version 4 (TCP/IPv4) and highlight it then click the Properties button. You are now in a numbers page. Click the Use the following DNS Server Address.
Now go back to the DNS Benchmark app, it should have done its search, and from the list on the left you will see numbers in the form x . x . x . x say 152.63.25.42. You could use any but for now I would look for Google. Its open DNS servers are 8.8.8.8 or 8.8.4.4. Note whatever they are.
Go back to the last W10 windows and in the Preferred DNS server enter one set of numbers, say 8 space 8 space 8 space 8 and in the Alternative DNS server put in the other numbers. Choose OK and Close to get out. Now try to get online.
It looks complicated but it is ever so easy.
-

Workingman - Posts: 22107
- Joined: 26 Nov 2012, 16:20
Re: DNS server not responding to Windows 10
I've got a bit stuck Frank. I have downloaded the file. I have clicked nameservers and run benchmark - but nothing seems to have happened. I followed instructions for the laptop and then went back to the downloaded file. I couldn't see any of the google numbers. There were numbers on the left but I think they were already there before I clicked anything. I am a lost cause with computers!
-

medsec222 - Posts: 1041
- Joined: 05 Feb 2013, 19:14
Re: DNS server not responding to Windows 10
Hang on, you are using two computers, right? One to get online and VV etc. and one that will not connect. I'll put some pics up to help. Give me an hour or so.
-

Workingman - Posts: 22107
- Joined: 26 Nov 2012, 16:20
Re: DNS server not responding to Windows 10
Yes, the laptop does not connect to the internet so I used my pc to do the download and then went to the laptop to follow your instructions. Thanks Frank.
-

medsec222 - Posts: 1041
- Joined: 05 Feb 2013, 19:14
Re: DNS server not responding to Windows 10
OK. I'm back.... let's go.
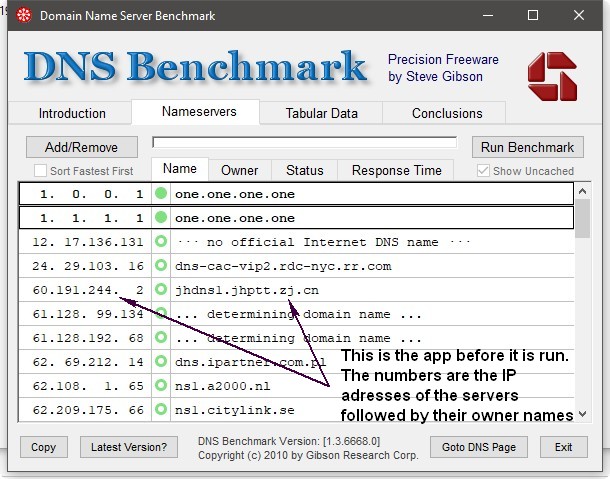
First, run the DNS app from the desktop. This is what you will see.
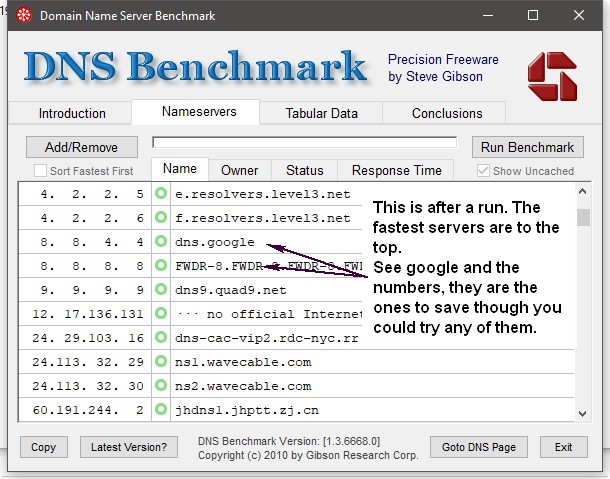
When it finishes the fastest servers are at the top, but fast is not everything, reliability is very important, hence google, for now.
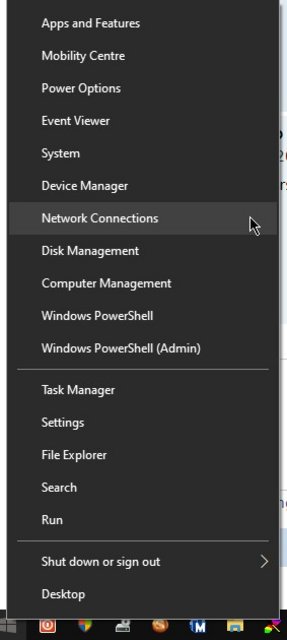
While all that is going on get back on the laptop and follow the "how to" images by first right clicking on the start button - bottom left of the taskbar - and choosing Network Connections. There are notes in the images.
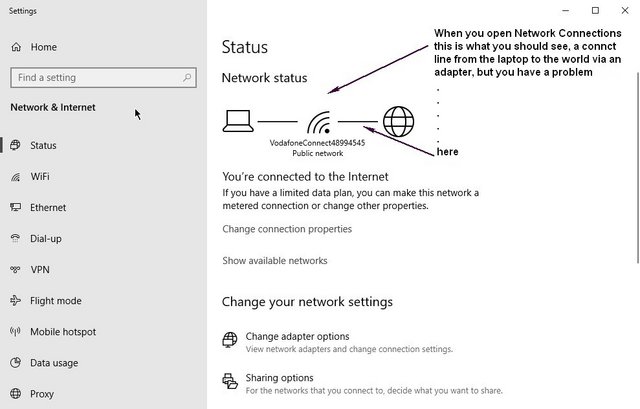
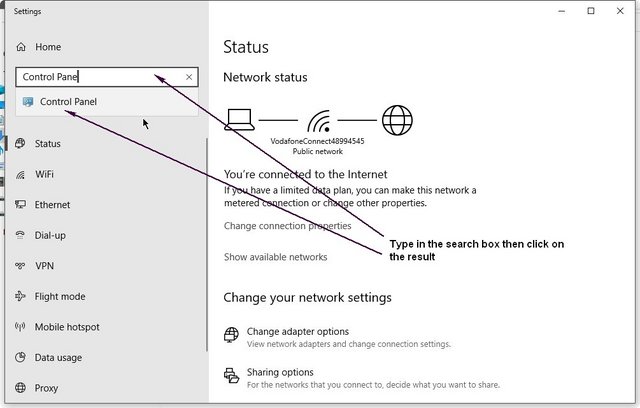
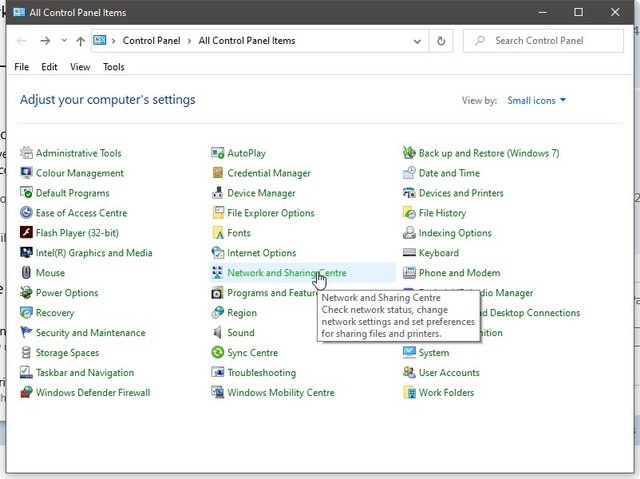
I am assuming your laptop uses WiFi, but it would not matter if you hook it up by Ethernet the method is still the same.
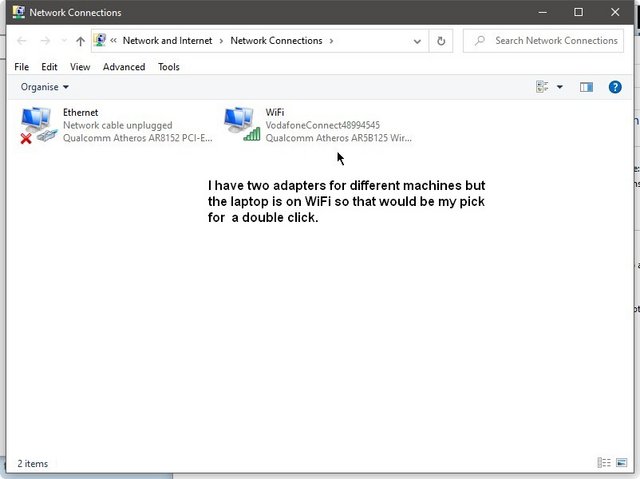
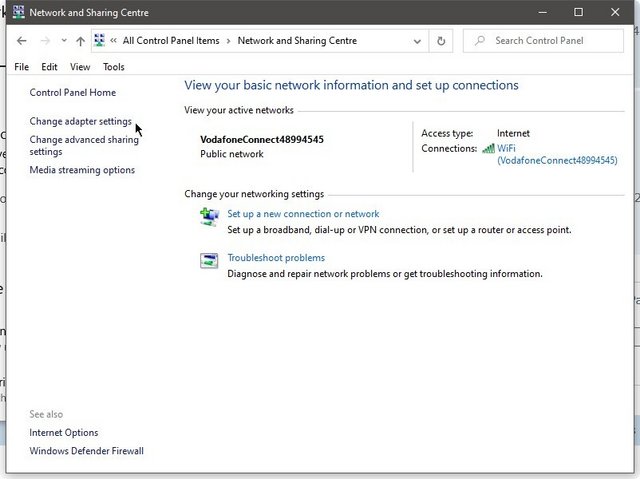
All you have done so far is select things, from the next image you will be making changes.
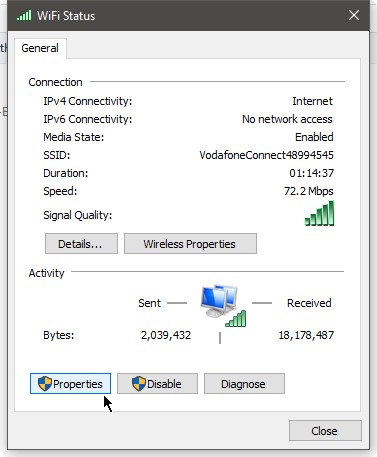
This is your adaptor and if you look at the info your Media State should show disabled. Click Properties.
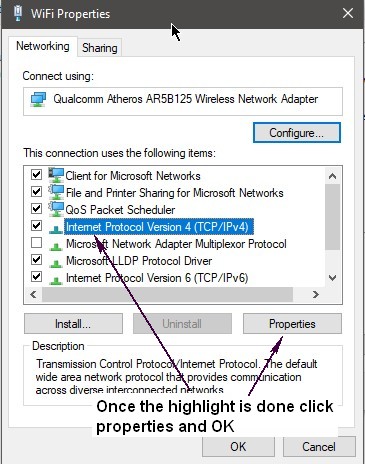
Now we are in. Click anywhere on the IPv4 line to highlight it then go to Properties.
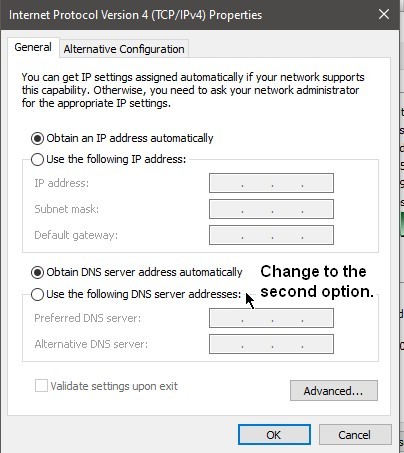
What you will now see is just an open form with both options set to automatic. There is not much you can do about the first, but you can change the second by changing it from auto to providing your own addresses. This is what you are about to do.
Remember the DNS app and those numbers, well this is where they go. Start at the left. Each section can accept three digits so you need the space key to jump to the next when using fewer. I am using Cloudflair hence the 1 . 1 . 1 . 1 line etc,
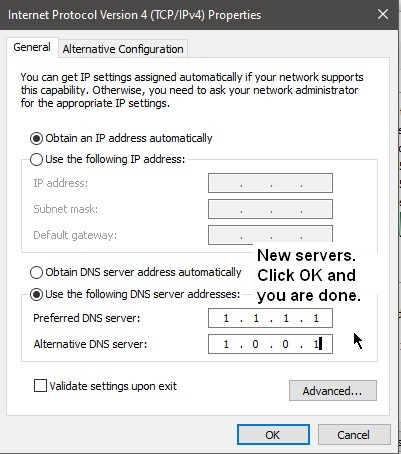
Once the numbers are in you click OK and then close all the windows. Yours should be 8 . 8 . 8 . 8 and 8 . 8 . 4 . 4
BTW you can force your ISP servers to be used by doing the same. A search should let you find them. Some people like to have an open DNS as the primary and one of their ISP's as a secondary.
First, run the DNS app from the desktop. This is what you will see.


When it finishes the fastest servers are at the top, but fast is not everything, reliability is very important, hence google, for now.
While all that is going on get back on the laptop and follow the "how to" images by first right clicking on the start button - bottom left of the taskbar - and choosing Network Connections. There are notes in the images.


I am assuming your laptop uses WiFi, but it would not matter if you hook it up by Ethernet the method is still the same.


All you have done so far is select things, from the next image you will be making changes.
This is your adaptor and if you look at the info your Media State should show disabled. Click Properties.

Now we are in. Click anywhere on the IPv4 line to highlight it then go to Properties.

What you will now see is just an open form with both options set to automatic. There is not much you can do about the first, but you can change the second by changing it from auto to providing your own addresses. This is what you are about to do.

Remember the DNS app and those numbers, well this is where they go. Start at the left. Each section can accept three digits so you need the space key to jump to the next when using fewer. I am using Cloudflair hence the 1 . 1 . 1 . 1 line etc,

Once the numbers are in you click OK and then close all the windows. Yours should be 8 . 8 . 8 . 8 and 8 . 8 . 4 . 4
BTW you can force your ISP servers to be used by doing the same. A search should let you find them. Some people like to have an open DNS as the primary and one of their ISP's as a secondary.
-

Workingman - Posts: 22107
- Joined: 26 Nov 2012, 16:20
Re: DNS server not responding to Windows 10
I don't seem to be able to even get started. I have got the screen of the DNS Benchmark tool, I have clicked on Nameservers and then clicked on run benchmark but nothing happens, the screen stays exactly the same and whatever I click I get the download prompt at the bottom of the screen and so go round in circles. I have looked at a You-Tube instruction and the screen is supposed to change when you click run benchmark but mine doesn't. I'm at a loss to know what I am doing wrong.
-

medsec222 - Posts: 1041
- Joined: 05 Feb 2013, 19:14
Re: DNS server not responding to Windows 10
OK let's take a shortcut.
Forget the DNS. Fire up the laptop with the problem and just follow the next steps from this thread to check the adaptors and change the Nameservers and use the numbers I gave earlier. Once done reboot and try again.
Forget the DNS. Fire up the laptop with the problem and just follow the next steps from this thread to check the adaptors and change the Nameservers and use the numbers I gave earlier. Once done reboot and try again.
-

Workingman - Posts: 22107
- Joined: 26 Nov 2012, 16:20
Re: DNS server not responding to Windows 10
There's good news and bad news Frank. I managed to get the Benchmark up and running and spotted the two google sets of numbers. So that's the good news. I went back to the laptop and followed your instructions and it seemed to be going well. I got to the bottom and put in 8 8 8 8 and then 8 8 4 4 and clicked OK. Logged off and shut down. Sadly no internet. I ran a troubleshooter and it came up the DNS server isn't responding. So I don't know if I should have clicked on the google numbers on the benchmark. I did try that but nothing happened. Story of my life.
-

medsec222 - Posts: 1041
- Joined: 05 Feb 2013, 19:14
Re: DNS server not responding to Windows 10
OK please do this for me and let me know the results.
Right click on the Windows start button, go to Run and type in cmd
In the black box after the C:/Users/name/> type ping BBC.co.uk and hit enter.
You should get something like.
Pinging BBC.co.uk [151.101.0.81] with 32 bytes of data:
Reply from 151.101.0.81: bytes=32 time=19ms TTL=58
Reply from 151.101.0.81: bytes=32 time=20ms TTL=58
Reply from 151.101.0.81: bytes=32 time=20ms TTL=58
Reply from 151.101.0.81: bytes=32 time=19ms TTL=58
Ping statistics for 151.101.0.81:
Packets: Sent = 4, Received = 4, Lost = 0 (0% loss),
Approximate round trip times in milli-seconds:
Minimum = 19ms, Maximum = 20ms, Average = 19ms
I just need to know if ping is working not the details.
Now go back and type ipconfig and hit enter
This returns...
Windows IP Configuration
Ethernet adapter Ethernet:
Media State . . . . . . . . . . . : Media disconnected
Connection-specific DNS Suffix . :
Wireless LAN adapter Local Area Connection* 1:
Media State . . . . . . . . . . . : Media disconnected
Connection-specific DNS Suffix . :
Wireless LAN adapter Local Area Connection* 2:
Media State . . . . . . . . . . . : Media disconnected
Connection-specific DNS Suffix . :
Wireless LAN adapter WiFi:
Connection-specific DNS Suffix . : broadband
Link-local IPv6 Address . . . . . : fe80::3457:d91a:bde0:5409%19
IPv4 Address. . . . . . . . . . . : 192.168.1.5
Subnet Mask . . . . . . . . . . . : 255.255.255.0
Default Gateway . . . . . . . . . 192.168.1.1
I am only interested in the info from Media that i connected and working. In my case the last one.
You can catch the text and do a copy & paste by highlighting it and doing right click on the top bar of the command window then follow the menu to Edit > Copy.... then paste it in a post.
Ta.
-

Workingman - Posts: 22107
- Joined: 26 Nov 2012, 16:20
29 posts
• Page 1 of 3 • 1, 2, 3
Who is online
Users browsing this forum: No registered users and 7 guests
